The 2-3 zone is the most popular and well-known zone defense in basketball. Teams of all age and experience levels use it as a way to change pace, slow down an aggressive opponent, or create an equal playing field when they feel overmatched.
Most people are familiar with Hall-of-Fame Coach Jim Boeheim and his famous 2-3 zone defense with Syracuse University. But don't worry, you don’t need the athletes Syracuse had to make this zone work for your team!
2-3 Zone Defense Diagram
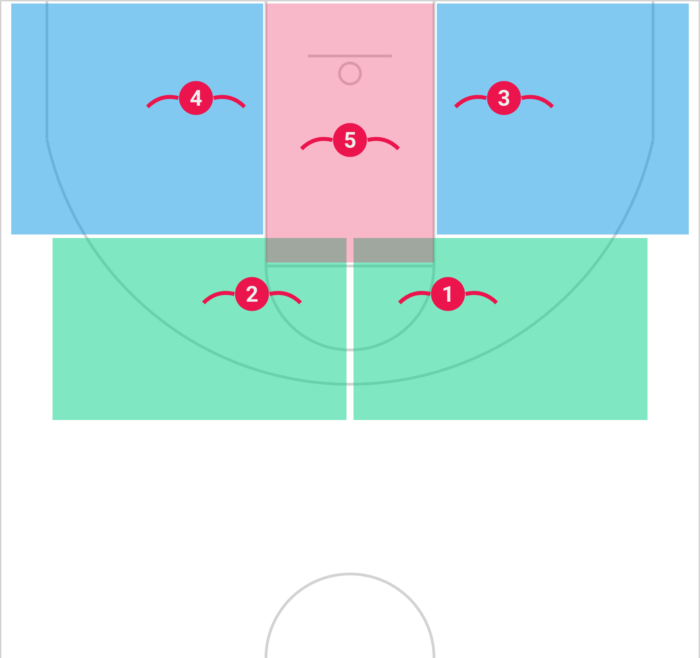
As you can see in the diagram below, the basic 2-3 set up includes two guards up top (1 and 2), two forwards in the corners (3 and 4), and a post/inside player in the middle (5).
Advantages of a 2-3 Zone
1. Keeps the ball out of the paint
This is probably the number one reason teams play the 2-3 zone: they want to protect the paint. When you play this zone, it allows your team to already BE IN help position instead of having to constantly rotate, change sides of the floor, switch, and guard multiple actions. Your players are already where they need to be.
Having these areas covered puts teams in situations where they may have to rely on the outside shot - typically a lower-percentage type of shot - instead of getting paint touches off of dribble penetration and post entries.
2. Can be used against teams that can’t shoot well from outside
It’s very difficult to score against a 2-3 zone if you don’t have shooters. The defense can pack it in even tighter which makes it even more difficult to get an open shot inside the paint.
3. Slows the game down
If you’re playing a team that likes to play fast and push in transition, getting back to your spots in the zone defense can slow them down and force them to play in the half court instead of getting easy layups during fast break situations.
It also forces your opponent to pass the ball around more when they are seeking an advantage. This creates longer possessions which leads to fewer overall possessions during the game. When there are fewer possessions the underdog has a better chance to pull of an upset.
4. Lowers your likelihood of fouling
Since there is less screening action and dribble penetration to defend, players foul less often in a 2-3 zone. While players still need to keep the ball in front of them and play with their hands off, they are simply put in much fewer of those situations over the long haul of the game.
5. Easy to flow into transition offense
This is an underrated advantage but a real one. When you get a rebound, your team is probably ALREADY in their fast break spots. Since your bigger players stay inside, it’s more likely they get the rebound. Since your guards are further up top, it’s easier for them to be your natural outlets. Then the wings can sprint down their side of the floor. You can take advantage of rebounds, long rebounds, and deflections with this defense.
6. There are only so many ways to attack it
Against man-to-man, there are thousands of attack options. Against a zone defense, there just aren’t as many ways to attack it. There are a few common ways (which we will go over later) that teams love to use. Once your team has those mastered, there’s not a lot more the defense can throw at them.
Weaknesses of a 2-3 Zone
1. Difficult to get defensive rebounds
One of the main weaknesses of the 2-3 zone is rebounding. In traditional man-to-man defense, it’s easy to know who you are blocking out - you simply box out your matchup. In the 2-3 zone, this is more difficult. Instead of a person, you are responsible for rebounding from your specific zone.
But what if there is more than one person in your zone? This is where it gets tricky, leading to offensive players being able to crash the boards unbothered by the defense.
2. Good shooting teams will hurt you
If a team has good shooters on the floor they can hurt you by making you pay from behind the three point line. This can also be difficult to defend because if a team has good shooters, they can really spread the zone thin. A spread-out zone then leads to more opportunities to attack the paint or throw into the middle/high post/inside.
3. Comebacks are less likely
You can still come back using a zone. It’s a good change of pace defense. But it does typically force the offense into longer possessions - especially if there's no shot clock.
4. The offense controls who goes where
The defensive players and their spots are typically pretty set in stone. This allows your opponent to be able to choose their matchups. For example, if you have a weak defender the opposing coach may put their best player on their part of the floor.
5. Once teams figure it out...
When teams figure out the rotations and how your team plays the 2-3 zone, they can start to punish the defense more easily.
General Rules
1. Active hands
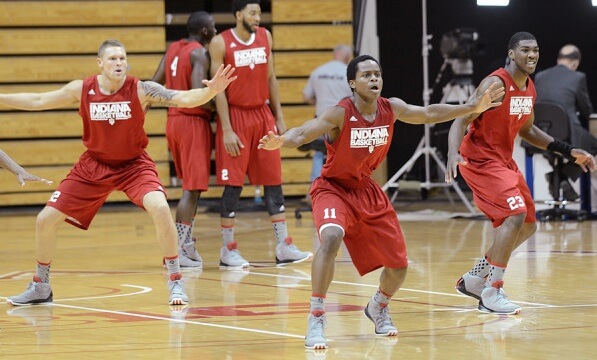
Players MUST have active hands when closing out. This means their hands are high and blocking vision on passes and shots. This discourages the offense to swing the ball as quickly and/or shoot it. We are trying to cause a lot of deflections for fast break opportunities.
2. Sprinting when the ball is moving
If defensive players wait until the ball has already been received on a pass, they are moving too slow. They must be sprinting to get to their next spot in the rotation. The defense will be too easy to exploit if the ball can be zipped around and reversed.
3. Everyone rebounds their “zone”
As mentioned above, each player has a “zone” they must rebound from. Playing zone is not an excuse to not box out!
4. One player on the ball
This is one of the most important rules of the 2-3 zone defense. Only one player should be guarding the ball at a time (unless you’re trapping of course).
This allows the other 4 players to be in good position to help and rotate to their spots.
5. Communication is key
Players must communicate on screens, cuts, and passes. This is especially important from the backside and center of the zone since they can see everything that is happening in the play.
Standard Rotation of the 2-3 Zone Defense
Let's go through the different formations when defending in a 2-3 zone. We are going to talk about the responsibilities of each player and what we are trying to achieve and prevent as a team.
1. Ball at the Top of the Key
When the ball is at the top of the key we have two guards at the top of the key (x1 and x2), two forwards (x3 and x4) just outside of the low block and a center (x5) roaming the middle of the zone.
What's the goal?
The guards at the top of the key need to make sure that the point guard can't attack the paint.
We want to encourage a horizontal pass to one of the wings. Since we are not denying passes to the wings and our guards are busy at the top of the key, our forwards need to be ready to help and close out to the wings if a pass occurs (more on that later).
If there is an opposing forward positioned in the high post we need to make sure to deny the pass.
What to do when the point guard is a good shooter?
If the opposing point guard is a good shooter defending in a 2-3 zone becomes a little more difficult as we can't sag off as easily.
The guard who is closest to the ball yells "Ball" and makes sure that the shooter can't get a shot off or penetrate into the zone.
The other defender at the top of the key (X1) needs to make sure that the pass to the high post is not open.
The strong side defender in the low post (X4) moves up a little to be prepared to close out to the wing player on a pass.
How do we rotate when the offense passes to the wing?
Since we only have two guards up front our forwards need to be ready to help out whenever the ball gets passed to a wing.
In this scenario the defensive player (x2) is occupied defending the ball so they can't quickly close out to the left wing on a pass.
As soon as the ball is in the air the left forward closes out to the receiving player to prevent a shot. The guard then rotates over and bumps the forward back to their original position.
2. Ball on the Wing
When the ball is on the wing we want to make it as hard as possible for the offense to get the ball into the zone. We are especially denying passes to the high post. We are okay with passes to the corner or ball reversals / skip passes.
Most important goal for the defense here is to deny the pass to the high post as this is a very vulnerable position.
- x3 is fronting the low post (x5 is helping)
- x2 is denying the pass to the high post
- x1 is defending the ball
- x4 is ready to pick up weak skip passes and defend backdoor cuts
We want to make it impossible to pass directly to the low post here
- x3 steps a little further out to be able to rotate to 4 in case of a pass (no deny)
- x2 can sag off a little more into the paint when the high post is empty
How do we rotate on passes from the wing?
- x3 closes out to the ball in the corner
- x5 fronts #5 to deny a pass to the low post
- x2 sags into the zone to make a pass to #5 more difficult
- We are rotating back to the standard 2-3 formation.
- x2 defends #1 closely if they are a dangerous shooter, otherwise x2 can sag off
https://www.thehoopsgeek.com/basketball-plays/2-3-zone-top-of-the-key/
- x4 closes out to #3
- x4 gets bumped back down once x2 makes the rotation
- rest of defense rotates to regular formation for ball on the wing
3. Ball in the Corner
When the ball is in the corner we want to prevent passes to the high post and low post. We can sag off and pack the paint, or force the player with the ball to make a play.
This is the standard way of defending the ball in the corner in a 2-3 Zone
- x3 puts pressure on the ball
- x5 fronts the low post and denies a pass
- x1 sags into the zone to make a pass or dribble attack for #4 difficult
- x2 is denying a pass to the high post
- x4 is ready to rotate on skip passes
This is the slightly more aggressive option. You deny the pass back to #2 and force #4 to make a decision. Only recommended if #4 is a weaker player with the ball.
When the ball is in the corner it's also an opportunity to make an aggressive play and trap the player, this is covered later in this article.
4. Ball in the High Post
We want to avoid the ball going to the High Post at all cost! If it happens anyways, the offense has 4 passing options which makes it very hard to defend.
Our primary goal is to prevent a high-low pass by packing it in the zone. At the same time, defenders need to be prepared to close out on shooters after a pass.
- x5 defends the ball
- x1 and x2 crowd the high post and force him to pass out
- x3 needs to prevent a pass to the low post
Advanced Concepts
Now that we learned the basics of the 2-3 Zone Defense let's take a look at a few more advanced concepts:
Trapping in a 2-3 Zone Defense
Trapping can be very effective, especially against teams that are less confident and not used to playing a zone defense. In general you want to put pressure on the ball and deny the easy passes making the attacking team attempt long passes over the zone. Steals rarely come at the point of attack but by picking off bad passes.
Here are some different trapping options. They are most effective if you use them sparingly and as a surprise:
You can trap the wing in a 2-3 zone.
In this diagram, 1 passes to 2.
2 follows the ball and traps.
4 leaves the corner to trap the wing.
5 replaces 4 and takes the low block.
1 takes the high post area.
3 stays between 3 and 4 and tries to read the pass out of the trap for a steal.
Teams will often flash 4 to the high post.
1 denies 4 the ball.
Now, 3 can cheat up depending on the formation to try and get a steal out of the trap.
If the ball ends up in the short corner (like the pass from 1 to 4 here), you can trap it.
4 and 5 set the trap.
3 takes the rim (since that will be the most open/vulnerable pass on the floor)
2 stays near the elbow and denies the high post area
1 takes away the immediate pass back out to 1.
A common move by the offense will be to send 5 to the rim.
If this happens:
- 3 takes 5
- 4 and 5 stay in their trap
- 1 takes away the obvious pass back out from the passer
Now, 2 is playing between 3 and 2 trying to make a read for steal.
NOTE: This should be used sparingly and as a surprise tactic. It should also be used only right when the ball crosses half court.
As soon as the ball crosses half court, the zone defense "blitzes".
- 1 and 2 try to contain the ball in the middle of the floor with a trap
- 3 and 4 cheat up to take the wings
- 5 reads a deep pass between 4 and 5
Trap alignment
Switching to Man Defense
Some teams like to match up and go man-to-man whenever the ball is entered into the high post. This keeps offenses off balance and allows teams to play a little bit of a hybrid man-to-man and zone defense.
If the ball is thrown into the high post (like this diagram), another wrinkle of the 2-3 zone is to go man-to-man.
Each player takes the closest matchup that makes the most sense.
It is up to the coach's discretion whether or not the off ball players matchup in typical man-to-man defense or go in full denial on 5's catch in the middle.
Final Words
While the 2-3 zone defense can be an effective strategy at any level, it should be used with care, especially in youth basketball. The defense is undoubtedly powerful, allowing teams to win more games and exploit opponents’ weaknesses. However, relying on it as a primary defense can stunt player development, particularly when it comes to man-to-man defensive principles.
That said, the 2-3 zone can serve as a valuable tool when integrated strategically into a team’s game plan. By adjusting the level of trapping, aggression, and rebounding focus, coaches can tailor the zone to fit their team’s strengths.
Ultimately, the 2-3 zone, when executed properly, is far from a lazy defense—it demands mental and physical discipline from the players and can yield significant results.

Founder of thehoopsgeek.com. A passionate basketball enthusiast and coding geek, Andy combines a love for sports with technology.

